Showing posts with label SL_Design. Show all posts

Monday, 3 May 2010

Stig tests

“Some say that he's a LSL experiment gone wrong, and that he only eats cheese...all we know is he's got Panache”


This month, The Stig test-drives a megaprim creation Web site.


Available from: http://www.megaprim.sl/

Cost: Free

Delivery: Immediate

Contents: megaprim of requested size

Permissions: Copy, Modify, Transfer


If you have ever found yourself searching for a megaprim of a particular size, you’ll find this site very handy and easy to use.
All you have to do is tell it the dimensions you want and it will give you a list to choose from.
Click on the one you want, and it will be delivered to you inworld.

If it’s your first time, you’ll have to verify your avatar identity by clicking on a link in an IM sent to you.
If the megaprim you want is a sphere, pyramid, cylinder or other shape, simply order a cuboid prim and change its shape in the build window.

Is there something you would like to see The Stig test-drive in a future issue of LOL!?
IM Stig Panache with details of the item and where to find it.

Getting Creative

Titiana Haystack presents the latest in her series of building articles

Charles Rennie Mackintosh Chair

Okay folks, we’ve made a bowl, a lantern and a coffee table, (not to mention a t-shirt texture to upload ( I said not to mention it!) and while making them we’ve learnt to rez, resize, position, and texture objects. If you don’t know how to do these you need to go back to the previous tutorials in LOL or on my website http://titihaystack.wordpress.com

Today we’re going to make a chair. Not just any chair, but a stylish Rennie Mackintosh one. I Googled chair images to get an idea of dimensions and patterns. This chair has more prims than anything we’ve done so far, but you will get practice in positioning prims, and you can carry this learning over to other stuff.

So here goes. First, rez the ubiquitous cube (or box as it is called in SL) This is going to be the wooden chair base. Leave the x and y dimensions at .500 and make the z dimension .100 Originally I textured it with mahogany, and just changed some selected faces to a pattern, but in the end I made all the faces the same by selecting Floor Tile 3 out of the Library. I coloured it a reddish brown so the pattern was only just visible. Your chair doesn’t have to end up looking like mine. You can improvise. I played around with the Flip commands later, and got an attractive pattern on the wood (not illustrated here)


We want to put a cushion in/on the chair, so the next thing is to hollow the chair to 80.

Next you need to duplicate the shape, so select it, and drag it up a bit while holding down the shift key. Take away the hollowness by changing Hollow back to zero, and change the colour to white. Now you can see the pattern. This is the cushion so it needs to be a bit smaller. Change the x and y dimensions to .40 and .40, then gently lower the cushion into its base.(It says use .45 by .45 in the illustration, but the maths tells me it has to be .40 by .40 for the exact fit!)


Now we need to make the legs. Go to the brown base, duplicate it again, and drag it up out of the way so you can see what you’re doing.

Path cut .250

You now need to rotate it so it looks like two legs. The first time I did this I had to rotate it on the x axis, but the next time it needed to be on the y axis. Just see which is correct for you. Rotate it by 90 degrees anyway, and it will be upright.

You will find that the legs are positioned in the centre of your base, so you need to move them to the edge. You can do this mathematically, by moving it half the distance of the measurement of the base[i] (if this makes sense) but I just judge it by eye. When you’re happy with the position, duplicate it again and drag the new pair of legs to the other side of the base.


You now have a stool and you could stop here if you’re feeling lazy.

But we are just doing more of the same for the chair back. Select one of the pairs of legs and duplicate by dragging up. Do this three times, and you will have a ladder back chair. Well done.


Now to link it. Select all by dragging around it all, you will see everything highlighted, (make sure it is) then click Ctrl L to link it. (Cmd L on a Mac) Or you could go to the toolbar and select .Tool 4 Link from the drop down menu. I think it’s worth learning keyboard shortcuts as it’s quicker in the long run.

I explained before about naming objects and taking them into your inventory. I said to click ‘Take’. However, since then I use Edit -> More ->Take copy, as then a copy goes into your inventory. It seems safer somehow. If you Take before you’ve named it, you’ll find it’s called ‘Object’, maybe among a lot of other Objects, (shame on you), but it will be the one that is boxed in grey. If you organise your inventory by Date it will be the top object too. I usually organise by Name, but Date can be handy if you’ve lost something nameless!

So there we have it. Another item for our Second Life. Looking at my chair, I think the legs are too fat to be elegant. I’ll leave that to you to sort out. Also, you could add thin vertical slats instead of the horizontal ones. Hey,it’s your chair. Give it six legs! Have fun, and let me know what else you would like to build. See you inworld.

Keep out!

Commander Quandry brings us the latest in his series of scripting articles.

Keep Out!

Something I have been asked about a few times over the last few weeks is the locking of doors – or more to the point, making a door only work for the owner.

This technique is simple to implement and, since it is done through the touch event, works to stop anything working unless it is the owner doing the touching. So you can stop others from switching on your lights, or starting your swing, etc.

The code we will use is put into the touch_start event method for this example. However, it could equally be used in a collision event, or listen event, for objects that respond to being collided with or spoken to.

Create yourself a prim and add the New Script to it. We will edit the touch_start, that is already present.

The basic touch_start looks like this:-

touch_start(integer total_number)
{
llSay(0, "Touched.");
}

When the object it touched it says – Touched – in local chat. We will change this so that it says hello to it’s owner by saying, “Hello Master”. And to anyone else it will say, “Go away, you are not my Master”.

There are two functions we will use for this. Before explaining those just a word about the touch_start event. This event is designed to be able to handle several people touching it at once (or within an event cycle). The integer total_number identifies the number of touchers. We will not be using it for this example, but if our object we a notecard giver, with multiple choices of notecard, this allows the object to present the menu of notecard to several people and respond to the right person in each case.

The first function we will be using is the llDetectedKey function. This takes one parameter, an integer, and works for touch or collide. This parameter is asking the function to tell it who was the person who touched it, and the integer says which person touching we want. In our example we are only interested in the first person touching the object, so we pass 0 as the parameter.

The second function is llGetOwner and returns the key of the objects owner. By comparing these we can decide whether it is the owner doing the touching. Let’s take a look at the script:-

touch_start(integer total_number)
{
if (llDetectedKey(0) == llGetOwner())
{
llSay(0, "Hello Master");
}
else
{
llSay(0, "Go away, you are not my Master");
}
}

It is fairly simple to see what is going on here.

On touching an object the touch_start event method runs. We compare the llDetectedKey with the llGetOwner and if they are the same we use llSay to say hello to the owner. If they are not the same it says something different.

By using this comparison we can open a door, or start a swing, or anything else we want to do on the basis of ownership.

This has been a short article because the technique is simple – however it can be used very effectively for lots of things.

As always please contact me if you need any assistance with scripting. Commander Quandry in world, adr@rossers.net out of world.

Thursday, 1 October 2009

To script or not to script

LOL! presents the first in series of articles on the subject of scripting in Second Life by Commander Quandry.

That may be the question you have asked yourself. There is probably no one who has spent more than a day in Second Life that has not at the very least created the basic Box prim. Some will have even increased its size, rotation, or position. Others will have used some of the other properties to taper, slice, twist, cut, hollow, etc their prim to fashion it into something of use or beauty.

Using the edit window and some keyboard and mouse control quite a lot can be done with only one prim. Add others to the prim and objects of greater use can be created. However, in order to really get the benefits that Second Life offers you will want to add functionality to your object. A beautiful lamp is all well and good, but being able to turn it on and off and cast light on a room adds purpose to the design.

LSL provides a means to interact with the server and client systems. The server system is the application running on Linden servers; the client system is the software running on your PC. The scripts are interpreted at run time to fulfil the wishes of the scripter. Some of the functionality is built in and only has to be utilised – like “sit”. Other functionality has to be created.

Some of what we do in scripting is a “cheat” or, in other words, we have used some piece of useful functionality for another purpose, not intended. For instance using the “sit” and “unsit” functionality it is possible to “transport” someone around a SIM. This is not Teleporting in the true sense of Second Life but it usefully replicates teleporting by using the sit/unsit system for another purpose.

The basic elements of LSL are variables, functions, events and handlers. I will explain these a little. However, you will not fully appreciate them until you begin to use them as you script.
Variables

A variable is a word, or joined phrase, that is used to contain information useful to the script. There are different types of variable including integer, string, vector, list and rotation. There are others and we will visit them over the coming months. There are two ways to use variables – global and local. A global variable is available anywhere in the script, a local one is only available in the section of the script it is being used in.

Functions
Functions are the basis of scripting. There are LSL defined functions which form the basis of the scripting language. These functions you will learn as you develop your understanding of LSL. It is also possible to add your own functions. You might have a function that opens a door. You could then call that function when someone “touched” the door, or when they “collided” with the door, or if the owner said, “Open Sesame”. In each instance you would use the same piece of code, your function in the script, to actually move the prim to the open position.

Events and Event Handlers
The main thrust of LSL is for it to be able to react to user input – touching, sitting, talking, etc. Each of these activities create an Event and in scripting we write event handlers to do something when an event occurs. Some are obvious – touch. Some need to be set up – a “listener” for instance to hear when a user says something. We will cover most of these, and give you the tools to work out the rest, over the course of the articles.

The final thing I want to cover in this article is the Basic New Script. This will be a starting point for us and will set the scene.

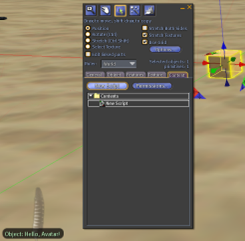
First rez a Prim – right-click the ground and select create – now left-click the ground. Your prim will appear along with an edit window. Click the “Content” tab of the edit window and click New Script. You will notice that when you created the new script the object said “Hello, Avatar!”. This is because every time you Make a New Script (and an object may have multiple scripts) the Basic Script is added.

Some basic things to note:

· All scripts have a “default” the contents of the default are between the first { in the script and the last }

· All sections of scripts are enclosed in { and }. This script has two parts to the default – state_entry() and touch_start() – again these are each enclosed in { and }

· Each line of code inside a section is terminated with a semi-colon ;
Now let’s take a look at it. Double Click the New Script in the contents.

· state_entry() an event handler that responds to the beginning of an object life. It is fired (events handlers are fired when events occur) when the object is rezzed, the script is created or saved or reset. It uses the llSay function to say “Hello, Avatar!” as we discovered earlier. Let’s look at the llSay function.

· llSay takes two arguments (arguments are pieces of information passed to the function) which are a channel to talk on (an integer) and something to say (a string). Channel 0 is the local chat channel so everyone gets to see the prim say its thing.

· The other event handler is the touch_start and it fires, as you might think, when an avatar touches the object. This handler also contains an llSay which just says, “Touched.”.


By changing the words in quotation marks you can change the greeting the object produces when it is rezzed/touched. Try it for yourself and see what happens!


In the next article we will make a few changes to the script to make the greetings more personal.
I hope that this has been of use, and that it has wet your appetite for more. If you need any in world assistance please IM me “Commander Quandry” or, alternatively email me, adr@rossers.net

Saturday, 1 August 2009

SLOODLE

Kickaha Wolfenhaut tells us about the next big thing.

The Open Life regions are witnessing a quiet revolution. After months of planning and technical jiggery-pokery by the computer boffins at Walton Hall, we finally took SLOODLE out of its box this morning. Over the coming weeks and months it will be tested with the help of an elite band of OU volunteers.

SLOODLE stands for Simulation Linked Object Oriented Learning Environment. No, I didn’t have a clue either, but let’s just say that while it might stand for Simulation Blah-de-blah-blah, what it actually means is this: Cool stuff in Second Life. SLOODLE is a set of tools and web based widgets that together enable us to do something hitherto impossible: Link the Second Life avatar you use around the OU islands to the “real” you – the one that logs onto http://www.open.ac.uk/ to submit TMAs and read course materials. For example, a quiz created by course staff on the website can be taken in Second Life and its results then fed straight back into your student record. And that’s just the beginning.

I foresee a time when virtual worlds will form a mainstream part of many Open University courses. I won’t rake over the case for virtual proximity, or start quoting from the massive amount of published research – chances are, if you are reading this, that I’d be preaching to the choir. Open Life has already hosted exploratory building tutorials for an engineering subject and unless you are a complete SL Muggle, it doesn’t take much effort to imagine an assignment in, say, an art & design course which is set, created and submitted within Second Life. SLOODLE’s Prim Drop tool makes the administrative side of such a proposition far easier and more scalable.
On the next page of this article you’ll find a list of the main SLOODLE tools and short descriptions, but I’d just like to give a special mention to one. Once you take rank paranoia and media hype out of the equation, the single biggest (and only really compelling) objection to the mainstreaming of virtual worlds in education is accessibility. Or rather, the lack of it. I’m not just talking about those with visual disabilities, for whom Second Life must seem at best a pain in the backside and at worst an unattainable Shangri-La, but also the technically impoverished – those for whom a high-specification computer and high-speed Internet connection are geographically impossible or just plain unaffordable. When defending Second Life and its peers in the face of jeering Luddites (did I say that?!!) the one statement which stops me in my tracks is this: “I can’t run Second Life.” There’s no objection in that. It’s just a bald fact. Enter WebIntercom, my favourite SLOODLE tool. WebIntercom allows those without Second Life to participate in live text chat with a group of in-world classmates. And what’s more, it’ll do it on a machine which would likely melt if its owner attempted to run Second Life. OK, so WebIntercom doesn’t allow non-SL users to build in-world. OK, so the interface looks like the north end of a southbound cow. But the biggest obstacle to mainstream SL has definitely begun to evaporate before our very eyes.

SLOODLE Website: http://www.sloodle.org/

YouTube videos: http://www.youtube.com/user/Sloodle

SLOODLE on Twitter: http://twitter.com/SLOODLE_News

SLOODLE on Facebook: http://www.facebook.com/group.php?gid=2396239341&ref=search


Some other SLOODLE tools

SLOODLE Presenter* - Create media presentations mixing images, video and web-pages, without having to upload images into Second Life.

Sloodle WebIntercom - Synchronizes chat (live!) between a course chat and Second Life.

Sloodle Toolbar - Wearable toolbar/HUD for blogging, classroom gestures and more. A SLURL for the user’s position and a snapshot of the location may be automatically included with a blog entry. Note that at this time the OU’s preferred blog system is a non-standard one and is therefore not compatible with SLOODLE. We may be able to recode the SLOODLE side in the future.

Sloodle Quiz Chair - Fetches questions from the course Quiz module and gives students the quiz in-world.

Sloodle Pile On Quiz - A multi-user quiz to involve a whole class.

Sloodle Prim Drop - Accepts Second Life objects and logs transactions in a Web database. A great way for students to hand in assignments in-world!

Sloodle MetaGloss - Lets you access a course glossary in-world

Sloodle Choice - Lets students respond to a course Choice in-world

Sloodle Vending Machine - Allows web-controlled and in-world distribution of objects for courses, tutorials and other activities.

Sloodle Awards System - Enables points to be awarded to students in Second Life, and also connects with the course grade book.